Setting up a Tabris.js Android App
This post is a set of notes put quickly together while I was experimenting with Tabris.js. It will get you from the installation of all the necessary components to an installable mobile application on a real device. Except for the build process which is Android specific, most of what is written should also hold for the iOS platforms.
Introduction
Tabris.js is a framework for building native Android or iOS mobile applications out from a single code base. It integrates a JavaScript execution engine that calls native widgets. Development is done either in JavaScript or in Typescript and the result can be seen immediately on a mobile application running on a real device connected to the development environment. Tabris.js also makes possible to reuse Cordova plugins to easily extend the basic functionalities. The current version of Tabris.js is 3.5.0.
Installation
To develop a mobile app, we need NodeJS, Tabris-cli, a text editor and the mobile developer application. We can work on Linux, Mac or Windows. What follows had been done on Linux.
- Install NodeJS from https://nodejs.org/
- Install
tabris-cliwithsudo npm install –g tabris-cli - Install Tabris.js developer mobile application from Android or Apple application stores, depending on the targeted platform. This app will be used during the development phase. Notice that for Android (I don’t know for other platforms), two developer applications are available on Play Store, namely, Tabris.js, and Tabris.js 2. The one to be installed is Tabris.js.
- For writing code any text editor will be fine. Yet, Tabris.js is able to generate special configurations for Visual Studio Code which makes it a nice choice. Visual Studio Code is available from https://code.visualstudio.com/Download.
If you want to build real .apk files, you will also need a Java JDK, the gradle build tool and an Android SDK.
- The Java SE JDK is available from the Oracle web site.
- gradle is available here: https://gradle.org/install/.
- Android Studio is available from Google developer site.
You’ll also need to set a couple of environment variables:
# Android SDK
export ANDROID_HOME=~/Android/Sdk
export ANDROID_SDK_ROOT=$ANDROID_HOME
export PATH=$ANDROID_HOME/tools:$PATH
export PATH=$ANDROID_HOME/emulator:$PATH
export PATH=$ANDROID_HOME/tools/bin:$PATH
export PATH=$ANDROID_HOME/platform-tools:$PATH
# Java
export JAVA_HOME=~/usr/jdk
export PATH=$JAVA_HOME/bin:$PATH
# Gradle
export PATH=~/usr/gradle/bin:$PATH
Creating the project directory
To create an application, create a project directory, enter it and type
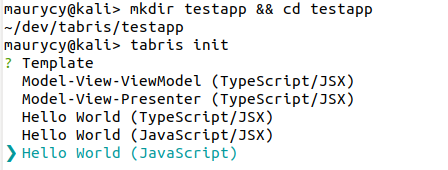
tabris init. Tabris will ask you few questions and eventually
create a project structure:
-
First Tabris will ask for the template to create and the language to use. We’ll select the basic Hello world in JavaScript.
-
Then it will ask for the applications name. It will propose the name of the working directory and that’s fine so we’ll leave it unchanged.

-
The default application ID is also fine.

-
At last, it will propose to create a Visual Studio Code project. You can, of course, use any text editor so select or unselect the option with space as you wish.

This will be the last question Tabris will ask you. After that, it will create the directory tree and download some npm packages.
Starting the application
Of course, the first thing we want to do is to see something on the device… For that we’ll need the Tabris.js developer app installed on the physical device (it should be already here as it was one of the steps in the installation section above) and the device connected on the same WiFi network as the development machine.
The principle is as follows. We will start a server on the development machine and connect the developer mobile app to that server. From that moment, the mobile app will execute the apps code sent by the server whenever there is a modification in the source code. Let’s put that in practice.
-
Start the server on the development machine. The
-aswitch enable automatic reload when the source code changes. The QR code or the IP addresses will be used to connect the developer app to the server.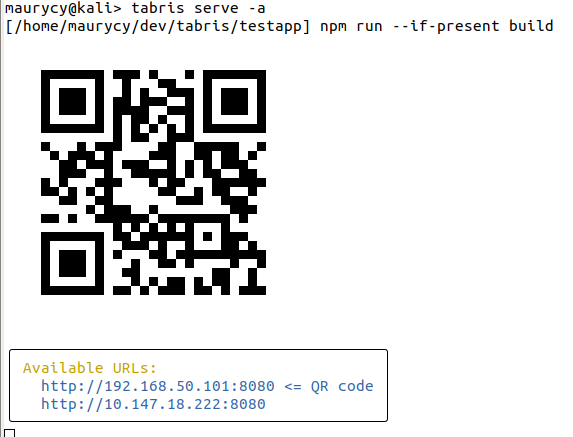
-
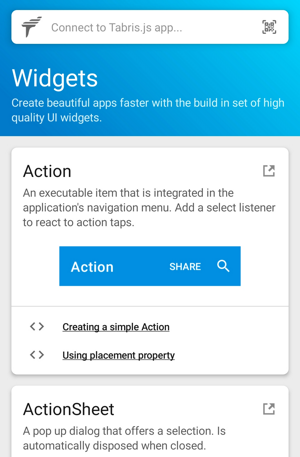
Start the developer app. You may either type in the IP address of the server as shown on the previous screenshot or scan the QR code if you tap on the small icon in the top-right corner of the app screen.
-
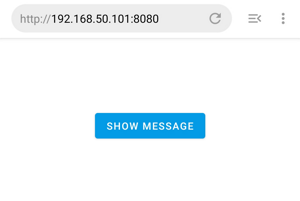
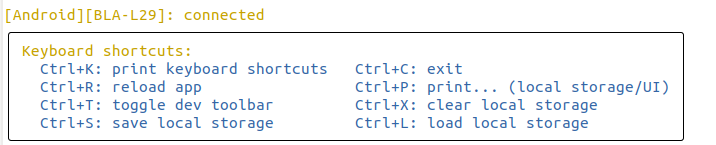
Once connected, you’ll see the app on the screen of your device. If you tap the button, you’ll get a nice Tabris.js rocks! message. The toolbar on top of the screen is a set of developer tools, like for example the JavaScript console. It can be hidden or shown again with a three finger double tap gesture.
Another interesting tool is the menu on the terminal where you’ve started the development server. It allows to do some manipulations or print some information on the device. Take few minutes to play with all the options.
That looks great! Let’s now convince ourselves on how easy it is to
make some changes to the application and to see the result
immediately. We’ll get into the directory structure a bit later but
for the moment just edit the file src/app.js and on line 7 change
textView.text = 'Tabris.js rocks!';
into
textView.text = 'My new app rocks!';
and save the file. In the server terminal you see a new log line
saying '/home/maurycy/dev/tabris/testapp/src/app.js' changed,
reloading app.... On the device, you see the application being
reloaded and if you tap the button, you get the new message.
This is not yet an APK, but we are on the right way. For now let’s see what the project directory looks like.
Exploring the project directory tree
I hope you won’t be too much disappointed but the exploration will be short as the project directory is really small and simple:
├── cordova
│   └── config.xml
├── node_modules
│   ├── acorn
│   ├── ansi-colors

... many more packages

│   └── write
├── package.json
├── package-lock.json
├── README.md
└── src
    └── app.js
It contains about 2500 files in 230 directories but for now there are only three files that are important. All others are npm packages that we’ll not touch:
-
package.json: Thepackage.jsonis a manifest file that describes the application, the entry point, what dependencies are needed, etc.. It’s a regular NPM package file and more information on that topic is available on NPM documentation page. -
src/app.js: thesrcdirectory contains the source files of the application. As we already saw before,src/app.jscontains the entry point of the application but if the application has many pages and components, each of these will have its own source file. -
cordova/config.xml: This is the Cordova configuration file that describes the app when building the APK. For example, it will hold the icon and the splash screen or the Cordova plugins if any is used. We won’t need this file until we build the APK.
Building an APK
In this section we’ll build a real Android mobile application out of
the skeleton that was generated by tabris init.
First, a real application has a graphical identity so let’s add an
icon and a splash screen. Creating graphical assets is difficult but,
hopefully, there are many online services that can create images for
free. Personally, I like
FreeLogoDesign as their database is
rich. Once you’ve create a logo, save it in the cordova directory as
logo.png. We’ll use the same file for both the applications icon and
as the splash screen so we add the following two lines to
cordova/config.xml:
<?xml version='1.0' encoding='utf-8'?>
<widget id="mszmurlo.testapp" version="0.1.0">
  <!-- few ommitted lines -->
  <preference name="EnableDeveloperConsole" value="$IS_DEBUG"/>
  <icon src="logo.png"/>     <!-- here -->
  <splash src="logo.png"/>   <!-- and here -->
</widget>
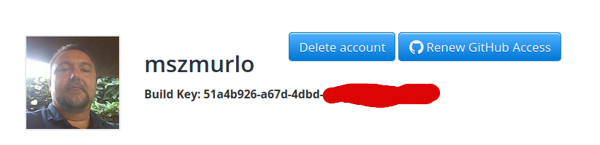
Building the APK is as difficult as typing tabris build android
and when asked, providing the build key. The build key is available in
your profile from the Tabris web site. Login with your Github account,
then head to the profile menu:
The first time you execute the build, the process may be long;
subsequent builds will be faster. The resulting APK, app-debug.apk
lies in the directory
build/cordova/platforms/android/app/build/outputs/apk/debug. It can
be now uploaded on the device with tabris run android or with adb
with the command line: adb install
build/cordova/platforms/android/app/build/outputs/apk/debug/app-debug.apk.
Notice that while the development process with the developer Tabris
application can be done on any device, uploading an APK requires the
device to be developer friendly, that is connected via USB,
accepting applications from any source and with development options
enabled.
The previous command line did build a debug APK. If we want to build
an APK for release on the store, we need to create a signed release
APK. To do this, we create a release APK with the following command:
tabris build android --release that will generate
app-release-unsigned.apk located in the
build/cordova/platforms/android/app/build/outputs/apk/release
directory. Next we need to sign that APK.
Signing the APK
Disclaimer: I’m definitely not an expert in these matters so what follows is just what I gathered from the internet.
To sign an APK, we need to perform the following steps:
-
Create a key store: To create a key store, type
keytool -genkey -v -keystore <ks-name>.keystore -keyalg RSA \
        -alias TestAppAlias -keysize 2048 -validity 10000
where you’ll replace
<ks-name>by a name you want (I’m usingMSZso that the key store is namedMSZ.keystore). The command will ask you for a password and for some personal information like your last name, first name, company name, city, country, etc..You’ll get a message saying that your key store doesn’t comply some international standard format so run the proposed command which should be
keytool -importkeystore -srckeystore <ks-name>.keystore -destkeystore MSZ.keystore -deststoretype pkcs12.This step will be done only once.
-
Build a release version : To build a release version of the app run
tabris build android --releaseas explained before. -
Sign the application : Get into the directory where the unsigned APK is located and sign it with the key we have just created and put in the key store. Then zipalign the APK (see the Android developer doc for more information:
cd build/cordova/platforms/android/app/build/outputs/apk/release jarsigner -verbose -sigalg SHA1withRSA -digestalg SHA1 \ -keystore ~/dev/tabris/MSZ.keystore \ app-release-unsigned.apk TestAppAlias $ANDROID_HOME/build-tools/30.0.0/zipalign -v 4 \ app-release-unsigned.apk testapp-signed.apk -
Upload the app on the device: While being in the APK directory, run:
adb install testapp-signed.apk.
Conclusion
Building a mobile app is fairly easy with Tabris.js. However, so far, we only saw the build process. In a forthcoming post, we will see how to put together some UI elements and glue them together with JavaScript.